Writeback to data-source using Extensions - Tableau
- Avdhesh Gaur

- Apr 30, 2019
- 3 min read
Updated: May 12, 2019
You will learn about writing back to the data-source from tableau itself, providing users the access to rectify data issues.

Every day we come across numerous posts, blogs and even video tutorials on how to create brilliant but complex charts, that might not be quite useful at your own organization. Some require data densification while others don't end up well with huge data sets.
Design with Ease
We @thevizduo.com will be coming up with handy yet useful tips that can be used with ease on a daily basis to attain better productivity at your workplace
Here is how we can write-back to a data source using extensions in tableau:
Step 1: Setting up the data source
We will use up google Spreadsheet, as the data source for this workbook.
Open up a new spreadsheet - Blank

Enter up the desired data and save the spreadsheet

Goto Tools > Script editor

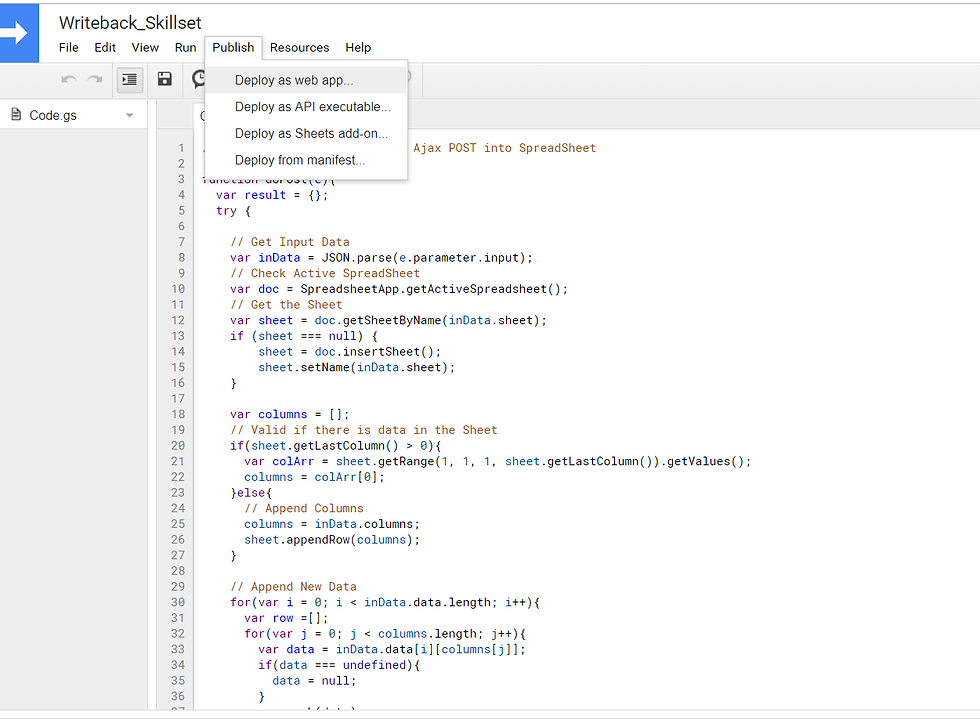
You need to enter the REST API over here, that will receive the data sent over via Tableau Write-back Extension
Copy the code from - Here (Git Hub Link)

Select Publish > Deploy as Web App
Under Project Version, Select "New"
Under "Execute the app as", Select your account
Under "Who has the access to the app", Select "Anyone, Even Anonymous"

Click Deploy. Login with your account when prompted.
Click Advanced, Goto "WriteBack Tableau (Unsafe)"
Grant the permissions by clicking Allow
Copy the "Current Web App URL". This will be required when we will configure the extension in Tableau.

Step 2: Setting up the Tableau Write-back Extension
Download the "Trex file", Which otherwise is known as Tableau extension from Tableau's Extension Gallery
Drag the Tableau Worksheets, for which you want to provide the source data write-back capability.
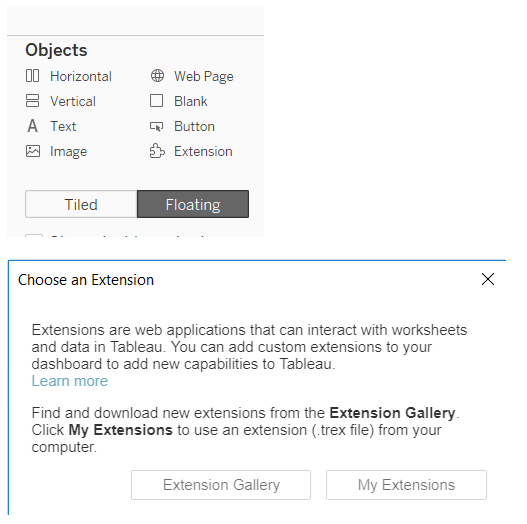
Drag the extension as well present under objects and select "My Extensions"

Traverse to the path where you have stored the "Trex file" and select it up, in order to add this extension.
Step 3: Configure Tableau's Write-back Extension
Right Click on the Extension drop down & Select Configure, Enter the details as mentioned:
Select the Worksheet = Your tableau Worksheet name
URL = Current Web URL that we copied from Step 1
Select the spreadsheet = Spreadsheet name from Google Spreadsheet


Submit the Configuration
Step 4: Write-back in Action
This is what Tableau's Worksheet-1 looks Initially

Below are the Xpand it Extension data write-back features with details, that are available within Tableau

Lets edit Row #4 with information mentioned as "Avdhesh Gaur - Tableau" to "Avdhesh Gaur - Tableau 2019.2" , by writing back the same to the data source using this extension.
Select the row for which you want to write-back the data.

Once it appears in the Xpand it Extension, Select that row from the extension.
Select the Edit Button

A pop up will appear. Enter the updated data in the desired field and Hit Submit.

Click on "Send the data" Icon.

The extension will write back updated data to the data source and the changes will get reflected in the Tableau Worksheet as well.

Data has been updated. This is how you can write-back to Google Spreadsheets
If you are writing back to any other data source, you will require the respective REST API in that case
Note: Make sure you have checked the below option that opens up on clicking on the rightmost icon (Options Sidebar)

Avdhesh Gaur has 5+ years of work experience with Tableau desktop, taking down various business requirements by building Data-driven Business Intelligence models using SQL, Hive, Tableau, and other Statistical data analysis Techniques. In a nutshell, He transforms data into visualizations to help organisations understand their business operations more visually.
Avdhesh got one of his submissions to Tableau accepted & placed in their permanent public knowledge database known as "Tableau Gallery" on 7th January 2019, which in a more cooler way we call Viz of the day


Hi Qin, we have an email on the Write-Back extension for support please reach out and we are more than glad to help you out.
Hi Avdhesh, I am the product manager for Write-back at Xpand IT and I am really glad you are using our extension. This is a great post with very detailed information.
Besides this version of the extension we also have a more corporate version that can store data on multiple database engines, maybe you can also take a look.
Hi Avdhesh. Your detailed steps are very useful. However, adding extra column and writing back don't work well for me. The extra column never shows up on the google sheet. Could you give me some idea? Thanks.